Mining with XMRig
Please note that currently XMRig only supports CPU mining for Zent Cash
Downloading and Installing for Windows
XMRig CPU Miner can be downloaded from the page.
Downloading and Installing for Linux
You can directly use the pre-built binaries for XMRig CPU. Download the xmrig-6.22.2-noble-x64.tar.gz file here.
Run the file using ./xmrig.
Instructions for compiling are linked below:
- XMRig CPU Miner (instructions for multiple platforms)
Downloading and Installing for Mac
You can directly use the pre-built binaries for XMRig CPU. Download the xmrig-6.22.2-macos-x64.tar.gz file here.
Instructions for compiling are linked below:
- XMRig CPU Miner (instructions for multiple platforms)
XMRig Setup and Configuration
CPU XMRig Configuration
- Unzip the file and extract the files into a new folder (Make sure your anti-virus doesn't delete the files)
- Open the
config.jsonfile with Notepad. - Find and change the following lines:
   algo: "[algorithm]"
   url: "[pool address]"
   user: "[wallet address]"
- Instead of
[algorithm], simply typeargon2/chukwa. - In place of
[pool address], you'll need to choose a pool to mine towards. You can learn more about them here. - Instead of
[wallet address], simply paste your Zent Cash wallet's address.- If you don't have one yet, you can find out how to create a wallet here
Example config.json
{
    "api": {
        "id": null,
        "worker-id": null
    },
    "http": {
        "enabled": false,
        "host": "127.0.0.1",
        "port": 0,
        "access-token": null,
        "restricted": true
    },
    "autosave": true,
    "background": false,
    "colors": true,
    "title": true,
    "randomx": {
        "init": -1,
        "init-avx2": -1,
        "mode": "auto",
        "1gb-pages": false,
        "rdmsr": true,
        "wrmsr": true,
        "cache_qos": false,
        "numa": true,
        "scratchpad_prefetch_mode": 1
    },
    "cpu": {
        "enabled": true,
        "huge-pages": true,
        "huge-pages-jit": false,
        "hw-aes": null,
        "priority": null,
        "memory-pool": false,
        "yield": true,
        "asm": true,
        "argon2-impl": null,
        "argon2": [0, 1, 2, 3, 4, 5, 6, 7],
        "cn": [
            [1, 0],
            [1, 2],
            [1, 4],
            [1, 6],
            [1, 7]
        ],
        "cn-heavy": [
            [1, 0],
            [1, 2],
            [1, 4]
        ],
        "cn-lite": [
            [1, 0],
            [1, 1],
            [1, 2],
            [1, 3],
            [1, 4],
            [1, 5],
            [1, 6],
            [1, 7]
        ],
        "cn-pico": [
            [2, 0],
            [2, 1],
            [2, 2],
            [2, 3],
            [2, 4],
            [2, 5],
            [2, 6],
            [2, 7]
        ],
        "cn/upx2": [
            [2, 0],
            [2, 1],
            [2, 2],
            [2, 3],
            [2, 4],
            [2, 5],
            [2, 6],
            [2, 7]
        ],
        "ghostrider": [
            [8, 0],
            [8, 2],
            [8, 4],
            [8, 6]
        ],
        "rx": [0, 2, 4, 6],
        "rx/wow": [0, 1, 2, 3, 4, 5, 6, 7],
        "cn-lite/0": false,
        "cn/0": false,
        "rx/arq": "rx/wow"
    },
    "opencl": {
        "enabled": false,
        "cache": true,
        "loader": null,
        "platform": "AMD",
        "adl": true,
        "cn-lite/0": false,
        "cn/0": false
    },
    "cuda": {
        "enabled": false,
        "loader": null,
        "nvml": true,
        "cn-lite/0": false,
        "cn/0": false
    },
    "log-file": null,
    "donate-level": 1,
    "donate-over-proxy": 1,
    "pools": [
        {
            "algo": "argon2/chukwa",
            "coin": null,
            "url": "ztcpool.sytes.net:10105",
            "user": "Ze4artgLD3pXn4YY1m4HREYsG5ZPE5dew5kxmuY6WtRa3tdAhnGgbqD6dtmX6wkidnX9uRgdtQsf1bvYoFhZjsvp1fUWd9Pqh",
            "pass": "x",
            "rig-id": null,
            "nicehash": false,
            "keepalive": false,
            "enabled": true,
            "tls": false,
            "sni": false,
            "tls-fingerprint": null,
            "daemon": false,
            "socks5": null,
            "self-select": null,
            "submit-to-origin": false
        }
    ],
    "retries": 5,
    "retry-pause": 5,
    "print-time": 60,
    "health-print-time": 60,
    "dmi": true,
    "syslog": false,
    "tls": {
        "enabled": false,
        "protocols": null,
        "cert": null,
        "cert_key": null,
        "ciphers": null,
        "ciphersuites": null,
        "dhparam": null
    },
    "dns": {
        "ipv6": false,
        "ttl": 30
    },
    "user-agent": null,
    "verbose": 0,
    "watch": true,
    "pause-on-battery": false,
    "pause-on-active": false
}
-
Save the file.
-
Start Binary.
xmrig.exefor Windows../xmrigfor Linux.
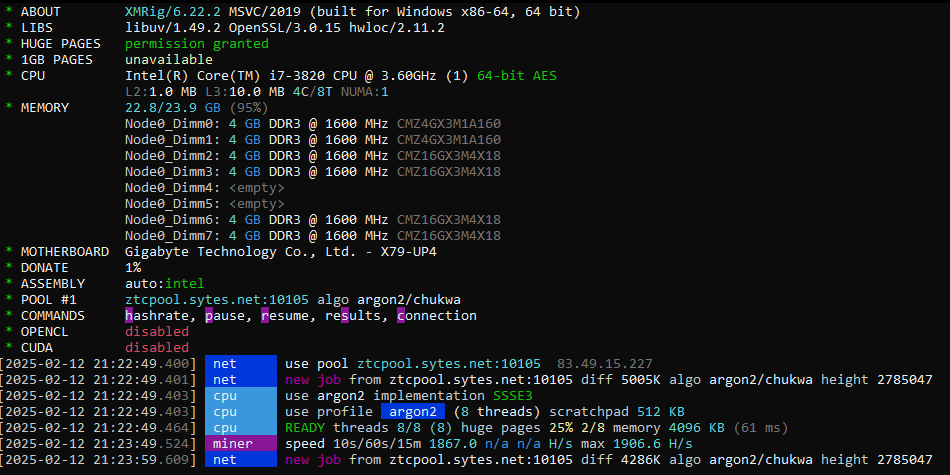
That's it! You should be mining away now!